c2py
Abstract
c2py() calls any Python functions with built-in, std::vector<T>, sstd::mat_c<T> and sstd::mat_r<T> (T is limited by built-in types.) types of arguments from 2 lines of C++ codes.
Data is sharing by the tmp directory.
c2py() は built-in 型,std::vector<T> 型, sstd::mat_c<T> 型,および sstd::mat_r<T> 型 (ただし,T は built-in 型に制限される.) を引数に持つ Python 関数を 2 行の C++ コードで呼び出します.
データは tmp ディレクトリにより共有されます.
Header file
namespace sstd{
    template<typename T> class c2py;
}

template<typename T>
class sstd::c2py{
public:
    c2py(const char* temporarilyDir,
         const char* importFile,
         const char* functionName,
         const char* format);
    ~c2py();

    template<typename... ARGS>
    T operator()(ARGS... args);
};
-
c2py interface
sstd::c2py<ATypeOfReturnValue> FunctionName( "Tempolary directory", // Argument 1 "A name of calling .py file (without extension)", // Argument 2 "A function name calling from .py file", // Argument 3 "Arguments types specification of Python function"); // Argument 4 -
c2py インターフェースの設計
sstd::c2py<戻り値の型> 関数名(
    "一時ディレクトリ",                            // 第 1 引数
    "呼び出し先の .py ファイル (ただし拡張子を除く)", // 第 2 引数
    ".py ファイル中から呼び出す関数名",             // 第 3 引数
    "Python 関数の型指定");                      // 第 4 引数
Requirements
c2py() requires the importlib, inspect, itertools, numpy, os and sys Python packages. See sstd/src/c2py.py for details.
c2py() は,importlib, inspect, itertools, numpy, os, sys の Python パッケージを必要とします.詳細は sstd/src/c2py.py を参照すること.
List of corresponding types. (対応する型の一覧)
Table 1. shows the correspondence between the types on the C ++ side and the types on the Python side.
Table 2. shows a list of type names given when specifying a type on the C ++ side.
If not specifying type on the Python side, numpy will be selected.
And selecting the conversion symbol ~, the numpy type will be converted to the built-in type.
The c2py is basically processed by numpy, because of the binary compatibility between C++ and Python,
type conversion of numpy to built-in type will be overhead.
表 1. に C++ 側の型と,Python 側の型との対応を示す.
表 2. に C++ 側の型を指定する際に与える型名の一覧を示す.
Python 側の型について,何も指定しない場合は,numpy 型が選択され,変換記号 ~ を指定することで,built-in 型に変換される.
c2py 上の処理は,C++ とのバイナリ互換性の問題から,基本的に numpy 型で行われるため,built-in 型への変換は,オーバーヘッドとなる.
| Types of C++ side | Types of Python side | ||||
| Entity / Pointer / Pointer array |
Entity / Pointer |
Entity / Pointer |
Entity / Pointer |
Entity / Pointer |
|
| bool | std::vector<bool> | sstd::mat_c<bool> | sstd::mat_r<bool> | numpy / built-in | |
| char | std::vector<char> | sstd::mat_c<char> | sstd::mat_r<char> | built-in | |
| uchar | std::vector<uchar> | sstd::mat_c<uchar> | sstd::mat_r<uchar> | built-in | |
| int8 | std::vector<int8> | sstd::mat_c<int8> | sstd::mat_r<int8> | numpy / built-in | |
| int16 | std::vector<int16> | sstd::mat_c<int16> | sstd::mat_r<int16> | numpy / built-in | |
| int32 | std::vector<int32> | sstd::mat_c<int32> | sstd::mat_r<int32> | numpy / built-in | |
| int64 | std::vector<int64> | sstd::mat_c<int64> | sstd::mat_r<int64> | numpy / built-in | |
| uint8 | std::vector<uint8> | sstd::mat_c<uint8> | sstd::mat_r<uint8> | numpy / built-in | |
| uint16 | std::vector<uint16> | sstd::mat_c<uint16> | sstd::mat_r<uint16> | numpy / built-in | |
| uint32 | std::vector<uint32> | sstd::mat_c<uint32> | sstd::mat_r<uint32> | numpy / built-in | |
| uint64 | std::vector<uint64> | sstd::mat_c<uint64> | sstd::mat_r<uint64> | numpy / built-in | |
| float | std::vector<float> | sstd::mat_c<float> | sstd::mat_r<float> | numpy / built-in | |
| double | std::vector<double> | sstd::mat_c<double> | sstd::mat_r<double> | numpy / built-in | |
| std::string | std::vector<std::string> | sstd::mat_c<std::string> | sstd::mat_r<std::string> | built-in | |
| Types of C++ side | ||||
| Entity / Pointer / Pointer array |
Entity / Pointer |
Entity / Pointer |
Entity / Pointer |
|
| bool | vec<bool> | mat_c<bool> | mat_r<bool> | |
| char | vec<char> | mat_c<char> | mat_r<char> | |
| uchar | vec<uchar> | mat_c<uchar> | mat_r<uchar> | |
| int8 | vec<int8> | mat_c<int8> | mat_r<int8> | |
| int16 | vec<int16> | mat_c<int16> | mat_r<int16> | |
| int32 | vec<int32> | mat_c<int32> | mat_r<int32> | |
| int64 | vec<int64> | mat_c<int64> | mat_r<int64> | |
| uint8 | vec<uint8> | mat_c<uint8> | mat_r<uint8> | |
| uint16 | vec<uint16> | mat_c<uint16> | mat_r<uint16> | |
| uint32 | vec<uint32> | mat_c<uint32> | mat_r<uint32> | |
| uint64 | vec<uint64> | mat_c<uint64> | mat_r<uint64> | |
| float | vec<float> | mat_c<float> | mat_r<float> | |
| double | vec<double> | mat_c<double> | mat_r<double> | |
| str / string | vec<str> / vec<string> | mat_c<str> / mat_c<string> | mat_r<str> / mat_r<string> | |
Usage
Sample1: (Return: "int" / Input: "int" and "const int*")
- pyFunction.py
def plus_a_b(a, b): return a+b - main.cpp
#include <sstd/sstd.hpp> int main(){ sstd::mkdir("./tmp"); sstd::system("echo 'def plus_a_b(a, b): return a+b' > ./tmp/pyFunction.py"); sstd::c2py<int> plus_a_b("./tmpDir", "./tmp/pyFunction", "plus_a_b", "int, int, const int*"); int a=1, b=2; int c=plus_a_b(a, &b); // Running Python here sstd::printn(c); sstd::rm("./tmp"); return 0; } - Execution result
c = 3
Sample2: (Return: "vec<int>" / Input: "const int*", "len" and "const vec<int>*")
- pyFunction.py
def plus_vecA_vecB(vecA, vecB): return vecA+vecB - main.cpp
#include <sstd/sstd.hpp> int main(){ sstd::mkdir("./tmp"); sstd::system("echo 'def plus_vecA_vecB(vecA, vecB): return vecA+vecB' > ./tmp/pyFunction.py"); sstd::c2py<std::vector<int>> plus_vecA_vecB("./tmpDir", "./tmp/pyFunction", "plus_vecA_vecB", "vec<int>, const int*, len, const vec<int>*"); int arrA[]={1,2,3}; std::vector<int> vecB={4,5,6}; std::vector<int> vecC=plus_vecA_vecB(arrA, 3, &vecB); // Running Python here sstd::printn(vecC); sstd::rm("./tmp"); return 0; } - Execution result
vecC = [5 7 9]
Sample3: (Return: "void" / Input: "int*", "int*", "len" and "vec<int>*")
Writing back self multiplied value.
自己乗算値を書き戻す.
- pyFunction.py
def selfMult(a, vecB, vecC): a[0]=a[0]*a[0] for i in range(len(vecB)): vecB[i]=vecB[i]*vecB[i] for i in range(len(vecC)): vecC[i]=vecC[i]*vecC[i] - main.cpp
#include <sstd/sstd.hpp> int main(){ sstd::mkdir("./tmp"); sstd::system("echo 'def selfMult(a, vecB, vecC):\n a[0]=a[0]*a[0]\n for i in range(len(vecB)): vecB[i]=vecB[i]*vecB[i]\n for i in range(len(vecC)): vecC[i]=vecC[i]*vecC[i]' > ./tmp/pyFunction.py"); sstd::c2py<void> selfMult("./tmpDir", "./tmp/pyFunction", "selfMult", "void, int*, int*, len, vec<int>*"); int a=2; int arrB[]={3,4,5}; std::vector<int> vecC={6,7,8}; selfMult(&a, arrB, 3, &vecC); sstd::printn(a); printf("arrB[3] = [ "); for(uint i=0; i<3; i++){ printf("%d ", arrB[i]); } printf("]\n"); sstd::printn(vecC); sstd::rm("./tmp"); return 0; } - Execution result
a = 4
arrB[3] = [ 9 16 25 ]
vecC = [36 49 64]
Sample4: Types conversion of numpy to built-in
Conversion types in Python side. Symbols on the right side of "|" (which is a separator symbol between C++ and Python) mean the symbols have effect on the Python side. On the right side of "|" enable to take "" or "~" and these order have no meaning. (There is no difference between "|~" and "|~*", so it will work same.)
- *: A symbol have a meaning to convert input value on Python side to a pseudo pointer type (self inclusion list).
- ~: A symbol have a meaning to convert input value on Python side to a built-in type (instead of numpy type).
Python 側で型変換を行う場合.セパレータ記号 "|" の左右は,それぞれ,C++ 側と Python 側を表している.分割記号 "|" の右側の型は "" または "~" を取ることができ,これは Python 側における変換記号である.このとき,変換記号 "","~" の順序は意味をなさない.(したがって, "|~" と "|~" の間に差はなく,同じように動作する.)
- *: Python 側の入力値を擬似ポインタ型 (自己包含リスト) へ変換する.
-
~: Python 側の入力値を(numpy 型の代わりに)組み込み型に変換する.
-
pyFunction.py
def checkTypes(Numpy, builtIn, pNumpy, pBuiltIn): print(type(Numpy), Numpy) print(type(builtIn), builtIn) print(type(pNumpy), pNumpy) print(type(pBuiltIn), pBuiltIn) - main.cpp
#include <sstd/sstd.hpp> int main(){ sstd::mkdir("./tmp"); sstd::system("echo 'def checkTypes(Numpy, builtIn, pNumpy, pBuiltIn):\n print(type(Numpy), Numpy)\n print(type(builtIn), builtIn)\n print(type(pNumpy), pNumpy)\n print(type(pBuiltIn), pBuiltIn)' > ./tmp/pyFunction.py"); sstd::c2py<void> checkTypes("./tmpDir", "./tmp/pyFunction", "checkTypes", "void, int, int|~, int|*, int|*~"); checkTypes(0, 0, 0, 0); sstd::rm("./tmp"); return 0; } - Execution result
<class 'numpy.ndarray'> [0]
<class 'list'> [0]
<class 'list'> [array([0], dtype=int32)]
<class 'list'> [[0]]
Sample5: Writing back with changing the length of std::vector<T>
Writing back with changing the length of std::vector<T>. (In order to get value from function, sending address is needed.)
配列長の変化を含む std::vector<T> の書き戻し.(関数から値を受け取るため,アドレスを受け渡している)
- pyFunction.py
import numpy as np def changeLen(pVec1, vec2): pVec1[0]=np.append(pVec1[0], 4) # numpy # numpy is not able to add values without changing address of variables. so we need to treat as a pointer like objects (self inclusion list). vec2.append(4) # built-in - main.cpp
#include <sstd/sstd.hpp> int main(){ sstd::mkdir("./tmp"); sstd::system("echo 'import numpy as np\ndef changeLen(pVec1, vec2):\n pVec1[0]=np.append(pVec1[0], 4)\n vec2.append(4)' > ./tmp/pyFunction.py"); sstd::c2py<void> changeLen("./tmpDir", "./tmp/pyFunction", "changeLen", "void, vec<int>*|*, vec<int>*|~"); std::vector<int> vec1={1,2,3}, vec2={1,2,3}; changeLen(&vec1, &vec2); sstd::printn(vec1); sstd::printn(vec2); sstd::rm("./tmp"); return 0; } - Execution result
vec1 = [1 2 3 4]
vec2 = [1 2 3 4]
Sample6
Receiving multiple return values from python side. (※ "ret" which is a symbol of return value, must be continuous in arg 4. Interrupted ret occurs error.)
Python 側から複数の戻り値を受け取る.(※ 戻り値記号 "ret" は,第 4 引数中で連続している必要がある.不連続な ret はエラーを引き起こす.)
- pyFunction.py
def multiRet(): return (9, 9, [1,2,3], [4,5,6]) - main.cpp
#include <sstd/sstd.hpp> int main(){ sstd::mkdir("./tmp"); sstd::system("echo 'def multiRet(): return (9, 9, [1,2,3], [4,5,6])' > ./tmp/pyFunction.py"); sstd::c2py<int> multiRet("./tmpDir", "./tmp/pyFunction", "multiRet", "int, ret int*, ret int*, len, ret vec<int>*"); int ret0=0; int ret1=0; int ret2[]={0,0,0}; std::vector<int> ret3; ret0 = multiRet(&ret1, &ret2, 3, &ret3); sstd::printn(ret0); sstd::printn(ret1); printf("ret2[3] = [ "); for(uint i=0; i<3; i++){ printf("%d ", ret2[i]); } printf("]\n"); sstd::printn(ret3); sstd::rm("./tmp"); return 0; } - Execution result
ret0 = 9
ret1 = 9
ret2[3] = [ 1 2 3 ]
ret3 = [4 5 6]
Appendix
Application sample 1
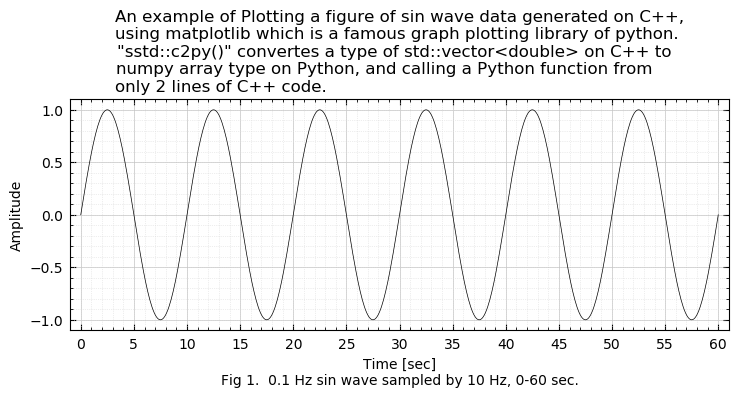
As one of the most convenient application, c2py enable to call matplotlib which is a famous graph plot library in python from C++. In the code below, generate sin wave on C++ and write graph by matplotlib in Python.
最も便利な応用の 1 つとして,c2py では,Python で有名なグラフプロットライブラリである matplotlib を C++ から呼び出すことができる.下記のサンプルコードでは,C++ 側で生成した sin 波を,Python ライブラリである matplotlib で描画している.
- pyFunction.py
import matplotlib as mpl # "QXcbConnection: Could not connect to display" への対策 mpl.use('Agg') # "QXcbConnection: Could not connect to display" への対策 import matplotlib.pyplot as plt # "QXcbConnection: Could not connect to display" への対策 import matplotlib.ticker as tick def vec2graph(writeName, vecX, vecY): plt.clf() fig = plt.figure(figsize=(9, 3)) # アスペクト比の設定 ax1 = fig.add_subplot(111) ax1.plot(vecX, vecY, color='k', linewidth=0.5) title = "An example of Plotting a figure of sin wave data generated on C++,\n" title += "using matplotlib which is a famous graph plotting library of python. \n" title += "\"sstd::c2py()\" convertes a type of std::vector<double> on C++ to \n" title += "numpy array type on Python, and calling a Python function from \n" title += "only 2 lines of C++ code. " ax1.set_title(title) ax1.grid(which='minor', linewidth=0.5, linestyle=':', color='gainsboro') ax1.grid(which='major', linewidth=0.5, linestyle='-', color='silver' ) ax1.tick_params(pad=5, which='major', direction='in', bottom=True, top=True, left=True, right=True, length=4) # 軸の余白 # which: major tick と minor tick に対して変更を適用 # tick を内側方向に # tick を bottom, top, left, right に付加 # tick width # tick length ax1.tick_params(pad=5, which='minor', direction='in', bottom=True, top=True, left=True, right=True, length=2) # 軸の余白 # which: major tick と minor tick に対して変更を適用 # tick を内側方向に # tick を bottom, top, left, right に付加 # tick width # tick length ax1.set_xlabel("Time [sec]\nFig 1. 0.1 Hz sin wave sampled by 10 Hz, 0-60 sec.") ax1.set_xlim(0-1, 60+1) ax1.xaxis.set_major_locator(tick.MultipleLocator(5)) ax1.xaxis.set_minor_locator(tick.MultipleLocator(1)) ax1.set_ylabel("Amplitude") ax1.set_ylim(-1.1, 1.1) ax1.yaxis.set_major_locator(tick.MultipleLocator(0.5)) ax1.yaxis.set_minor_locator(tick.MultipleLocator(0.1)) plt.savefig(writeName, bbox_inches="tight") - main.cpp
#include <sstd/sstd.hpp> int main(){ double freq2generate = 0.1; // 0.1 Hz sin wave double freq2sample = 10; // 10 Hz sampling uint len=60*10 + 1; // 60 sec std::vector<double> vecY = sstd::sinWave(freq2generate, freq2sample, len); std::vector<double> vecX(len); for(uint i=0; i<vecX.size(); i++){ vecX[i]=(double)i*(1/freq2sample); } sstd::c2py<void> vec2graph("./tmpDir", "pyFunctions", "vec2graph", "void, const char*, vec<double>*, vec<double>*"); vec2graph("./sin.png", &vecX, &vecY); return 0; } - Execution result
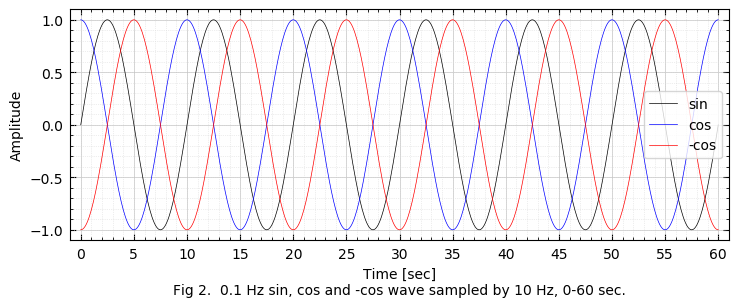
Application sample 2
An example of the additional implementation of vvec<T>. Currently, only vvec
追加実装された vvec<T> の使用例.現状では,vvec<double> のみ利用可能.
- Python
def vvec2graph(writeName, vLabel, vvecX, vvecY): plt.clf() fig = plt.figure(figsize=(8.5, 3)) # アスペクト比の設定 ax1 = fig.add_subplot(111) #cmap = plt.get_cmap("tab10") vColor=['black', 'blue', 'red'] vLineStyle = ['solid', 'solid', 'solid'] # solid, dashed, dashdot, dotted for i in range(len(vvecX)): #ax1.plot(vvecX[i], vvecY[i], linewidth=0.5, color=cmap(i), linestyle=vLineStyle[i], label=vLabel[i]) ax1.plot(vvecX[i], vvecY[i], linewidth=0.5, color=vColor[i], linestyle=vLineStyle[i], label=vLabel[i]) ax1.legend(loc='upper right') ax1.grid(which='minor', linewidth=0.5, linestyle=':', color='gainsboro') ax1.grid(which='major', linewidth=0.5, linestyle='-', color='silver' ) ax1.tick_params(pad=5, which='major', direction='in', bottom=True, top=True, left=True, right=True, length=4) # 軸の余白 # which: major tick と minor tick に対して変更を適用 # tick を内側方向に # tick を bottom, top, left, right に付加 # tick width # tick length ax1.tick_params(pad=5, which='minor', direction='in', bottom=True, top=True, left=True, right=True, length=2) # 軸の余白 # which: major tick と minor tick に対して変更を適用 # tick を内側方向に # tick を bottom, top, left, right に付加 # tick width # tick length ax1.set_xlabel("Time [sec]\nFig 2. 0.1 Hz sin, cos and -cos wave sampled by 10 Hz, 0-60 sec.") ax1.set_xlim(0-1, 60+1) ax1.xaxis.set_major_locator(tick.MultipleLocator(5)) ax1.xaxis.set_minor_locator(tick.MultipleLocator(1)) ax1.set_ylabel("Amplitude") ax1.set_ylim(-1.1, 1.1) ax1.yaxis.set_major_locator(tick.MultipleLocator(0.5)) ax1.yaxis.set_minor_locator(tick.MultipleLocator(0.1)) plt.legend(loc='best') plt.savefig(writeName, bbox_inches="tight") # , dpi=100 - main.cpp
#include <sstd/sstd.hpp> int main(){ double freq_generate = 0.1; // 0.1 Hz sin wave double freq_sample = 10; // 10 Hz sampling uint len=60*10 + 1; // 60 sec std::vector<double> sinY = sstd::sinWave(freq_generate, freq_sample, len); std::vector<double> sinX(len); for(uint i=0; i<sinX.size(); i++){ sinX[i]=(double)i*(1/freq_sample); } std::vector<double> cosY = sstd::cosWave(freq_generate, freq_sample, len); std::vector<double> cosX(len); for(uint i=0; i<cosX.size(); i++){ cosX[i]=(double)i*(1/freq_sample); } std::vector<std::string> vLabel={"sin", "cos", "-cos"}; std::vector<std::vector<double>> vvecX={sinX, cosX, cosX}; std::vector<std::vector<double>> vvecY={sinY, cosY, -1*cosY}; sstd::c2py<void> vvec2graph(tmpDir, fileName, "vvec2graph", "void, const char*, const vec<str>*, const vvec<double>*, const vvec<double>*"); vvec2graph("./sin_cos.png", &vLabel, &vvecX, &vvecY); return 0; } - Execution result
Application sample 3
In the code below, reading png image from Python, editing on C++ and writing to png file by Python again.
Python 関数から png ファイルを読み込み,C++ で色を編集した後,再度 Python 関数で png ファイルへ書き出すサンプルコードを示す.
- Python
import numpy as np from PIL import Image def imgPath2mat_rRGB(path): imgRaw = Image.open(path) imgRGB = imgRaw.split() imgR = imgRGB[0] imgG = imgRGB[1] imgB = imgRGB[2] return (imgR, imgG, imgB) def mat_rRGB2img(path, imgR, imgG, imgB): imgCombined = np.dstack((np.dstack((imgR, imgG)), imgB)) imgPIL = Image.fromarray(imgCombined) imgPIL.save(path) - main.cpp
#include <sstd/sstd.hpp> int main(){ sstd::c2py<void> imgPath2mat_rRGB("./tmpDir", "pyFunctions", "imgPath2mat_rRGB", "void, ret mat_r<uint8>*, ret mat_r<uint8>*, ret mat_r<uint8>*, const char*"); sstd::mat_r<uint8> imgR, imgG, imgB; imgPath2mat_rRGB(&imgR, &imgG, &imgB, "./sample.png"); for(uint p=0; p<imgG.rows(); p++){ for(uint q=0; q<imgG.cols(); q++){ imgG(p, q) = sstd::round2even(0.5*((double)imgG(p, q))); } } sstd::c2py<void> mat_rRGB2img("./tmpDir", "pyFunctions", "mat_rRGB2img", "void, const char*, mat_r<uint8>*, mat_r<uint8>*, mat_r<uint8>*"); mat_rRGB2img("./sample_reCombined.png", &imgR, &imgG, &imgB); return 0; } - Execution result


Input image (sample.png) Output image (sample_reCombined.png)
Implementation
- Source: sstd/src/c2py.cpp
- Header: sstd/src/c2py.hpp
- Python: sstd/src/c2py.py
- Test: test/c2py.hpp